.png?width=300&height=76&name=Logo_Chromatic(Formerly%20Quil%20LG).png)
This article covers recording, uploading, and calling from the desktop app. For managing candidates, projects, or companies, use the CoRecruit web app instead.
The desktop app is designed to stay focused on capture.
Downloading the desktop app
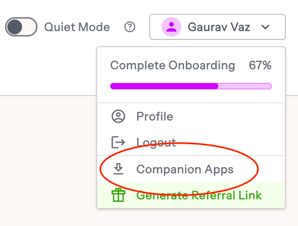
You can download the desktop app, along with the other companion apps, from within the CoRecruit web app:
- Select your profile dropdown in the top right corner of the web app.
- Select Companion Apps.
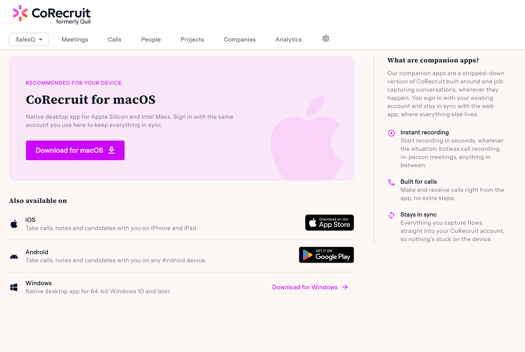
- On the Companion Apps page, select Download for macOS or Download for Windows, depending on your device. Links to the iOS and Android apps are also available here.
Recording a conversation instantly
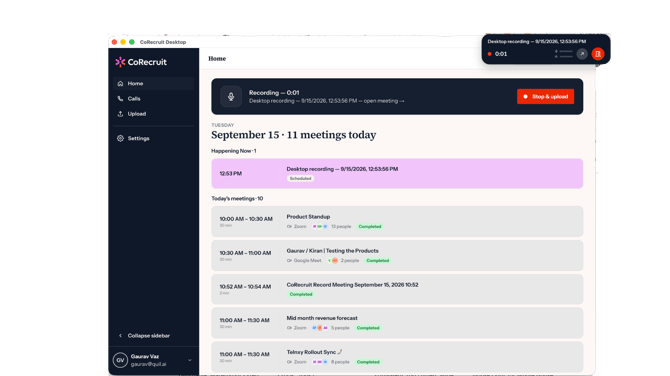
From the Home screen, select Start Recording at the top of the page to begin recording immediately. This is the fastest way to capture an in-person conversation, a call, or any conversation that doesn't have a bot joining it.
When you start a recording:
- CoRecruit creates a new meeting automatically, titled Desktop recording — [date and time].
- A small recording panel appears showing the elapsed time, along with your microphone and speaker levels.
- This panel stays on top of your other windows, so recording continues even if you switch to your browser or another app.
- Select Stop & upload when you're finished. CoRecruit uploads the recording and begins transcription right away.
Note: The desktop app records your microphone and, if configured, your screen — it never joins a call as a participant the way a bot does. This is what makes botless recording possible: nothing joins your call, so there's nothing for the other participants to notice.
Warning: If you record your screen for a video call rather than an in-person conversation or phone call, the resulting file will be much larger and take longer to upload and process. For video meetings, we recommend using your existing bot-based recording setup instead.
Starting a recording from the menu bar
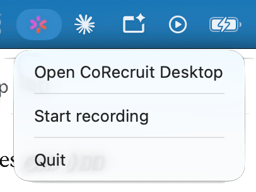
You don't need to have CoRecruit open to start recording. Select the CoRecruit icon in your menu bar (Mac) or system tray (Windows), then choose Start recording. This starts an instant recording the same way as selecting Start Recording from Home, so you can capture a conversation the moment it starts without switching windows.
From the same menu, you can also select Open CoRecruit Desktop to bring the app to the front, or Quit to close it.
Recording an incoming call
When a call comes in on your desktop through a supported calling platform, including Zoom, Microsoft Teams, Google Meet, Slack Huddles, or WhatsApp calls, the CoRecruit Desktop app prompts you to record it.
Accepting the prompt starts an instant recording the same way as selecting Start Recording manually.
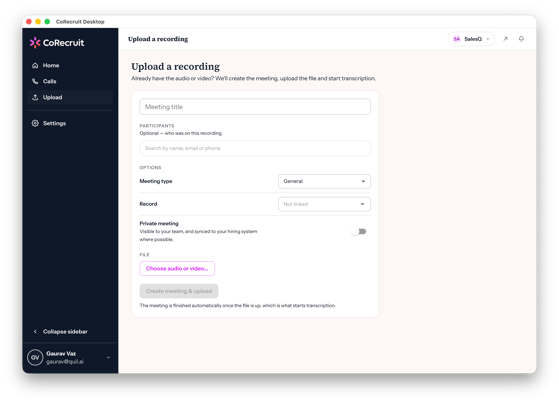
Uploading a recording you already have
If you've already recorded a conversation elsewhere, on your phone, a separate recorder, or another app, you can upload it directly.
- Select Upload from the sidebar.
- Enter a Meeting title.
- Optionally, add Participants by searching for a name, email, or phone number.
- Choose a Meeting type from the dropdown.
- Optionally, link the recording to a job record using the Record dropdown, so it's synced to your hiring system.
- Select Choose audio or video… and pick your file.
- Select Create meeting & upload.
Once the file finishes uploading, CoRecruit automatically marks the meeting as complete and starts transcription.
Managing your meeting details
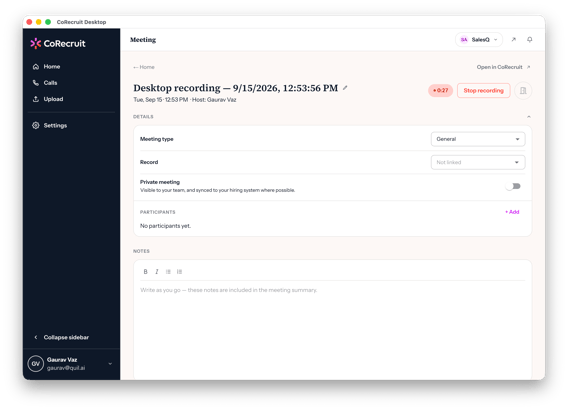
Whether a recording was captured instantly or uploaded, you can review and edit its details from the meeting page:
- Meeting type — categorizes the conversation (for example, General).
- Record — links the meeting to a specific job record in your hiring system. Shows Not linked until you connect one.
- Private meeting — controls who can see the recording. When this is off, the meeting is visible to your team and synced to your hiring system where possible.
- Participants — add anyone who was part of the conversation using + Add.
- Notes — write notes as you go; anything you add here is included in the meeting summary.
Making and receiving calls
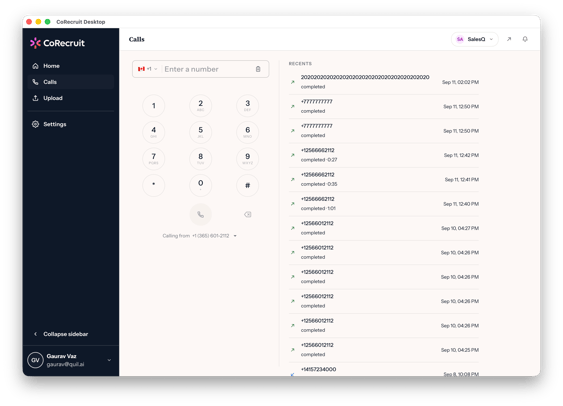
Select Calls from the sidebar to open the dialer.
- Confirm the number you're calling from, shown under the dial pad as Calling from.
- Enter a number using the dial pad, or paste one in using the clipboard icon.
- Select the call icon to start the call.
Your recent calls appear in the Recents list on the right, along with the call duration and status.
Frequently asked questions
Do I need to link a recording to a meeting before I start recording?
No. When you select Start Recording from Home, CoRecruit creates a new meeting for you automatically. You can edit its title, meeting type, and other details afterward from the meeting page.
Can I record a Zoom or Google Meet call using the desktop app?
Yes. When a call starts on a supported platform — Zoom, Microsoft Teams, Google Meet, Slack Huddles, or WhatsApp calls — CoRecruit prompts you to record it. It doesn't join the call as a bot; it records locally, the same way it does for an in-person conversation.
What happens if I record my screen during a video call by mistake?
The recording will still upload and process, but screen recordings of video calls produce much larger files, which take longer to upload and transcribe than an audio-only recording.
Where do I manage candidates, projects, or reporting?
The desktop app is focused on capturing conversations. For everything else — candidates, projects, companies, and analytics — use the CoRecruit web app.
Can I keep recording if I switch to another app?
Yes. The recording panel stays visible on top of your other windows, so you can switch to your browser or another app and the recording keeps running until you select Stop & upload.